Printing Basic
Printing Product Descriptions
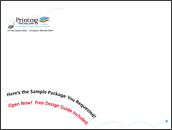
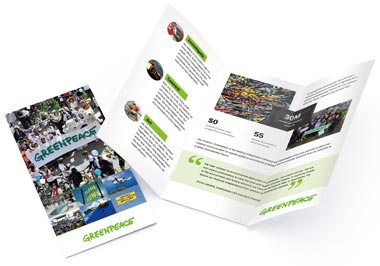
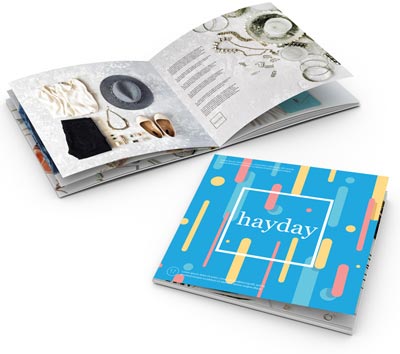
Brochures
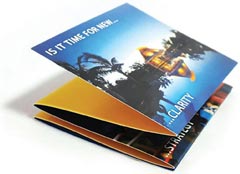
 Brochures are available in four standard sizes, 8-1/2 x 11, 8-1/2 x 14, 11 x 17 and 11 x 25-1/2, and many custom sizes. An unfolded 8-1/2 x 11 is often used as a flyer or product sheet or tri-folded or half folded for a company brochure. There are numerous paper choices and are printed with 4-color on the front side and blank, black only, or 4-color on the back.
Business Cards
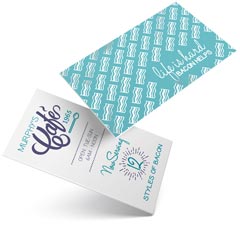
 Business cards are ordered in increments of 500. Cards are printed 4-color on the front, and blank, black-only, or 4-color on the back. Paper choices are 14pt 120# gloss (with optional UV coating), 120# dull/matte or 100# uncoated cover stock, 160# 18pt gloss cover and Magnet Stock for magnetic business cards. Folded business cards can be printed in both horizontal and vertical formats for twice the marketing power.
Catalogs
 Customers demand information, and product catalogs and booklets can generate orders. Catalogs come in two sizes, 5-1/2 x 8-1/2 and 8-1/2 x 11. Front and back covers are printed 4-color, and inside front and back covers are blank, black-only, or 4-color. Cover paper can be 80# gloss, 80# dull/matte, 100# gloss text or #80 gloss or dull/matte cover. Inside pages can be 4-color or black, on 80# gloss text, 80# dull/matte or 100# gloss text.
Postcards
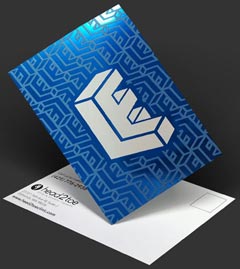
 Postcards are printed on high-quality 14pt 120# gloss, 120# dull/matte or 100# uncoated, and 160# 18pt gloss cover stock with four-color process printing on one or both sides or blank or black only on the back. Sizes are 4.25 x 5.5, 4 x 6, 5 x 7, 5-1/2 x 8-1/2, 6 x 9 and 6 x 11. Aqueous coating is free and optional UV or Soft Touch coating is available on the gloss stock.
Presentation Folders
 9 x 12 Presentation Folders are printed on 14pt 120# Gloss Cover and are available with your choice of 1 or 2 4-inch pockets with or without business card slits. The outside is printed 4-color, and the inside may be blank, black-only, or 4-color. Aqueous coating is applied to the printed sides.
Letterhead and Envelopes
 You can order custom letterhead and envelopes together, both printed 4 colors on one side. Our featured stock is 70# uncoated text. This ultra-smooth stock shows off your 4-color design beautifully, and is guaranteed laser-safe. Letterhead and envelopes can also be ordered separately.
Rack Cards
 Rack cards are a great way to promote your business to out-of-town visitors. We use a 4 x 9 size, with 4-color printing on the front side and blank, black-only, or 4-color on the back. Paper choices are 14pt 120# gloss cover, 120# dull/matte cover or 100# uncoated cover, and 160# 18pt gloss cover with free Aqueous or optional UV coating available on the gloss covers.
Newsletters
 Newsletters come in three sizes, 8-1/2 x 11, 11 x 17 and 11 x 25-1/2. We can print up to 8 pages (or more by special request), and offer a choice of economical 70# uncoated stock, 80# or 100# gloss or 80# or 100# dull/matte text stock. Multiple fold types are available.
Greeting Cards
 Greeting cards are printed 5 x 7 (folded), 4-color on the outside and 4-color, black, or blank on the inside. Paper options are 14pt 100# uncoated or 120# dull/matte cover, which are best for writing on the inside. 14pt 120# gloss cover is also available and includes aqueous coating at no extra charge. Cards can be ordered folded or unfolded, and printed or unprinted envelopes are available as an option.
Note Cards
 Note cards are printed 4.25 x 5.5 (folded), 4-color on the outside and 4-color, black, or blank on the inside. Paper options are 14pt 120# dull/matte or 100# uncoated cover which are best for writing on the inside. 14pt 120# gloss cover is also available, and includes aqueous coating at no extra charge. Cards can be ordered folded or unfolded, and printed or unprinted envelopes are available as an option.
Bookmarks
Buck Slips and Statement Stuffers
 Stuff your message into the minds of your customers with our statement stuffers! We offer 3-1/2 x 8-1/2, 7 x 8-1/2, 10-1/2 x 8-1/2, 5-1/2 x 8-1/2, 3-1/2 x 7, 7 x 7, and 10-1/2 x 7 sizes. Half-folds, tri-folds, and z-folds are available. Fronts are printed 4-color, and backs are blank, black, or 4-color. Papers include 70# uncoated text, 80# or 100# gloss text, 100# uncoated cover, and 14pt 120# gloss or dull/matte cover.
Door Hangers
 Door hangers come in 4.25 x 11 and 3.5 x 8.5 sizes. Front sides are printed 4-color, and back sides can be blank, black-only, or 4-color. Paper options are 100# Gloss Text and 14pt 120# gloss cover, 120# dull/matte cover or 100# uncoated cover, and 160# 18pt gloss cover. Aqueous coating is free and optional UV or Soft Touch coating is available on the gloss stock.
File Folders
 File Folders are printed on 14pt 120# Gloss Cover stock. Ink format options are: 4-Color Outside/4-Color Inside, 4-Color Outside/Black Inside, 4-Color Outside/Blank Inside, Black Outside/4-Color Inside, and Blank Outside/4-Color Inside. Free aqueous or optional UV coating is available on the printed sides. They are shipped unfolded.
Posters
 Posters are printed 4-color on one side, with a maximum size of 17 x 24. Paper is 100# gloss text or 80# gloss cover stock, with free aqueous or optional UV coating.We also offer full color Large Poster printing in 22" x 30" and 28" x 38" sizes mounted on foam core board.
CD Covers
 CD Covers are printed on #100 Gloss Text (industry standard) with a single-panel front cover and a perforated inlay card. The outside is printed 4-color, and the inside can be 4-color, black-only, or blank. Free aqueous or optional UV Coating is available on the printed sides.
Calendars
 Get a custom calendar made with your photos! Calendars are available in two sizes, 5 1/2 x 8 1/2 and 8 1/2 x 11, and are printed 4-color throughout, with a 1/8" drilled hole for hanging. Cover paper options are 80# gloss text, 70# uncoated text, 80# dull/matte text, 100# gloss text, and 80# gloss or dull/matte cover stock (8 1/2 x 11 only). The inside pages are printed on 80# gloss text weight, 70# uncoated text, 80# dull/matte text, or 100# gloss text. Aqueous or UV coating is available on front and back covers on gloss stock.
Large Envelopes
 Large Envelopes are available in two sizes; 9 x 12 and 9 1/2 x 12 5/8. The front is printed 4-color on either 28# Uncoated (70#) paper or 24# Uncoated (60#) (9 x 12 only). Options for the seal are glue or Peel & Seel® (28# paper only).
Carbonless Forms
 Carbonless or NCR Forms come in 2, 3 or 4 part sets and can be shipped loose or padded, with our without chipboard in pads of 25, 50 or 100. They can also be made into invoice or receipt books with a cover wrap. They can be printed with 4 color process, PMS colors or black on one or both sides.
Notepads
 Notepads are available in 4¼ x 5½, 5½ x 8½ or 8½ x 11, and other sizes by request. The front can be printed in 4 color, 1 or 2 PMS Colors or black. The back side can be ordered blank, or printed with black, PMS inks or 4-color process. They can be padded with or without chipboard in pads of 25, 50 or 100 sheets.
Plastic Cards
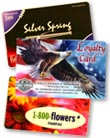 Plastic Cards come in 3-3/8 x 2-1/8 (credit card size), 3 x 5, 3-1/2 x 2 (business card size) or 4 x 6 inch sizes. They can be printed with 4 color process on the front and four color, black or left blank on the back. 30 mil and 20 mil plastic thicknesses are available. A lanyard slot is optional on either edge.
Post-it® Notes
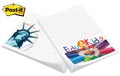 Post-it® Notes pads are available in 2-3/4 x 3, 3 x 4, and 4 x 6 inch sizes. The front is printed in 4 color process. They are printed on white Post-it® paper and can be ordered in pads of 25 or 50 sheets. Other paper colors and inks can be custom ordered.
Table Tents
 Table Tents are available in Standard A-Frame, Standing Triangle and Pyramid types in three sizes each. They can be printed full-color or black on the front on 14pt 120# gloss, 120# dull/matte or 100# uncoated cover stocks. Aqueous coating is free and there is optional UV or Soft Touch coating.
Literature Holders
 These patented custom brochure holders and rack card holders are made from fine white micro-flute corrugated board, printed with 4-color process on one side with aqueous coating. They hold approximately fifty pieces and stand approximately 10" high with a base that measures 6.25" wide by 4.25" deep.
Hang Tags
 Hang Tags are available in half inch increments between 1 and 10 inches. Standard options include full-color on the front, and blank, black-only, or full-color on the back on 14pt 120# gloss, 120# dull/matte or 100# uncoated cover, and 160# 18pt gloss cover stocks. Aqueous coating is free and there is optional UV or Soft Touch coating. They can be scored and round cornered and have optional hole sizes and placements with a variety of string types and colors.
Banners
 Vinyl Banners can be ordered in one foot increments from 1 x 1 to 5 x 48 feet. They are printed on one side with full color 5 year rated eco-solvent ink and come with extra strong weld hemming on all sides and punched metal grommets for hanging. Other options can be custom ordered.
Printing Paper Type Descriptions
Standard House Paper Stocks

Premium and Specialty Papers
SmartFlex® Synthetic Paper
- Our standard plastic substrate stock is flexible and water, heat and tear resistant.
- Available in 6pt, 8pt, 15pt and 20pt thicknesses.
- Tree and Pulp Free and 100% Recyclable.
- Standard uses: maps, menus, door hangers, posters or any product that can benefit from the increased durability of plastic.
Learn more about our synthetic papers.
Premium Papers
- Many Recycled Paper varieties from partial to 100% Post Consumer Waste.
- Textured finishes such as laid, linen, ribbed and felt are available with and without watermarks.
- Many colored stocks from light to dark colors for specialty projects.
- Get your company and printed pieces noticed and stand out from the crowd with a premium paper stock.
Learn more about our selection of premium papers.
Coatings
Aqueous Coating
- This clear coating is used to protect your printed pieces.
- It provides a high-gloss surface that deters dirt and fingerprints.
- Improves the durability of postcards as they go through the mail, and protects business cards as they get shuffled between clients.
- It also looks beautiful on brochures, catalog covers, and stand-alone flyers. Learn more...
UV Coating
- UV coating, often called liquid lamination, is a highly protective, ultra-shiny gloss coating that we apply over aqueous coating and then cure on a special machine using ultraviolet light.
- The solvent-free UV coating provides an extremely hard finish that's chemical and abrasion resistant.
- It makes details really pop! On deep colors, it results in a stunning, almost wet appearance.
- Perfect when you want a durable, environmentally-friendly piece with a richer, high-end look and feel.
- NOTE: UV Coating cannot be used on the addressed side of mailed pieces, unless the address is printed first and then the coating is applied. Learn more...
Soft Touch® Coating
- This coating creates a velvety texture.
- The paper becomes "soft" to the touch and increases the tactile appeal.
- Softer look and feel than aqueous or UV coating, while creating a barrier which is fingerprint resistant.
- It dries fast, is non-yellowing, and is eco-friendly.
- Luxurious and sophisticated are words often used to describe the finished product. Learn more...
The Complete Guide to Creating Press Ready Print Files
Even the best designers break out in a cold sweat when it comes time to send a project to a printer. There are a ton of moving parts, checklists and details to keep in mind when it comes to getting your project ready for commercial printing. This guide will cover the technical do's and dont's, give you tips and best practices and walk you through how to take a project from your computer to the printing press.How to Plan For Perfect Color Printing
One of the most common issues with professional printing is sending your printer graphics files that is in the wrong color space. Here's what you need to remember about color before you send your file to your printer.CMYK not RGB
Your computer uses a color space called RGB to produce the colors you see on your screen. A printing press uses a color space called CMYK to produce similar colors using just four colors of ink: cyan, magenta, yellow and black, also know as 4 color process. When you send your files to a commercial printer, they must be in the CYMK color space.This is so important that we have a whole page dedicated to RGB vs CMYK color space if you want to learn more.Here's how you change your color space in InDesign: When you create a new document, the color space changes based on your intent.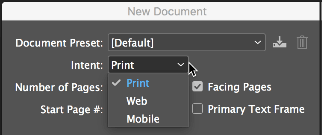
Spot Colors
Most of the colors produced in color printing are created by blending just 4 colors of ink: cyan, magenta, yellow and black. But sometimes you need a very specific color. Despite all of the advanced techniques and technology at a professional printer, matching the exact color from printer to printer and even from one order to the next can be a challenge. Consistent color-matching is what separates good printers from great ones.When you need a very exact color, such as Coca-Cola's trademarked red or John Deere's famous green, you'll need to use a spot color. A spot color is not created by mixing other types of ink, but rather it is made to order for the project at hand. This also means the printer must make an additional plate for the spot color, which usually makes using a spot color more expensive.If you have to use a spot color, you're likely using a color from the Pantone Matching System. It is a commonly used system of spot colors that helps press operators achieve the exact same shade, every time. Find a Pantone Color here.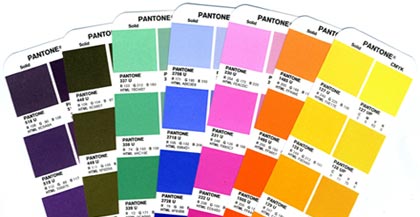
Planning Image Quality for Professional Printing
Low quality and low resolution images produce terrible, ugly, hideous printing but many people don't understand the relationship between quality and resolution. You must plan for your final output at the beginning of your design, otherwise you'll be left with an unusable final product.Print will always look better with higher resolution images. Let's get clear on what we mean by resolution.Image resolution is how much data is in a digital image, it is directly related to how many pixels are in the image. When you print an image, you must transfer that data into dots per inch (DPI) which determines the image quality of a printed piece. Usually, 300 DPI is what you'll need. Most images on your computer are not at 300 DPI, but 72 DPI. This is because 72 DPI looks good on most computers and the files are much easier for the computer to store and display. Be sure to check your images for print quality and insure that they are 300 DPI or higher.How to Resample Images for Printing
Resizing images can lead to problems when they are printed because the resolution can be unintentionally changed.When you resample an image, you are changing the amount of data in the image. Downsampling removes data and upsampling adds data. When you make an image smaller than its original size, you are downsampling it, when you make it larger you are upsampling.You should always avoid upsampling your images. Adding data to an image will usually result in a very poor printed image.How to Resample Images in InDesign
Sometimes you may want to resample an image to change the size that it will print. If you are downsampling, for example, resampling can make the image take up less space. In InDesign, make sure the Resample Image option is checked when you change the size of an image. It is checked by default. When Resample is checked, you change the data in the image when you up or downsample the image.- Changing pixel dimensions changes the physical size but not the resolution.
- Changing resolution affects the pixel density but not the physical size.
- Changing the physical size changes the pixel density but not resolution.
Changing an Image Without Resampling
When you uncheck the Resample Image box, the amount of data in the image is unchanged even when you change the size of the image. This has the effect of changing the pixels per inch (PPI) of your image. For commercial printing, you want a rather high PPI value.- For printing purposes you want 300 PPI or greater.
Which Image Formats Are Best For Printing?
When sending press ready design files to a printer you should send your images in the highest quality (not fastest) image format possible. Different image formats compress image data differently. PNG and TIFF images work the best for most print projects. JPG images work Ok at 100% quality, but every time the JPG is saved it is recompressed, so the quality can drop quickly if it is saved often at less than maximum quality.When Are Vector Images Important for Printing?
Most images are created using a bitmap, or series of dots, and are called raster images. Vector images are not made of dots, but a shape plotted by points along a mathematically generated path. Vector images can change to any size without losing quality. Popular vector image formats are AI, SVG and EPS formats. When you are printing commercially, vector images are very important.- Your text should always be in a vector format.
- Line drawings, such as plans or blueprints, should always be in vector format.
- Logos work best in a vector format.
Tips for Designing Great Images for Print
When possible, do the following:- Do not upsample your images.
- Make sure your images are at least 300 PPI (or 300-600 DPI).
- Use vector formats for text, line art and logos.
What Are Bleeds? Why are Bleeds Important?
A bleed is printed content that extends beyond the trimmed edge of your final printed piece. Bleeds are important because they allow your artwork to be cut without artifacts. If there is no bleed you may have a small white space around the cut edge. The bleed should be 0.25" larger than the trim size (0.125" on all sides). Learn more about bleed. You should design your project within the trim size and add bleed settings in InDesign.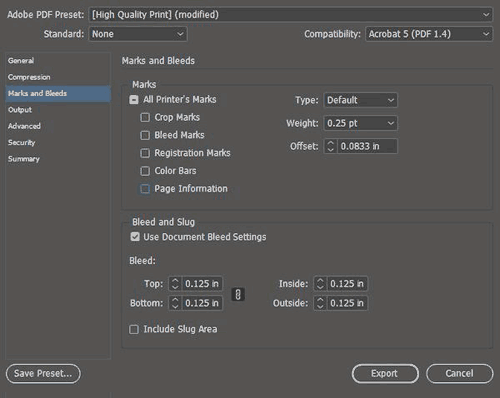
How do You Design for Folds?
If you are printing brochures, catalogs, folded cards, or boxes you'll need to plan for folds.- Use guides and the ruler to measure exactly where the fold will happen. Plan your artwork and design accordingly.
- Consider the thickness of your paper and the types of coatings and effects on your finished product, you may need to adjust where folds happen to accommodate paper thickness.
- Balance form and function with your folds, think about how someone will unfold and refold the piece: what do they see first, last and how does it go back together? Learn more about folds.
How to Design Your Project for Binding

- Remember to include blank pages so you have the right number of pages for your piece.
- Work with your printer when you're printing books and catalogs to get the pagination correct.
- Each binding format has a minimum and maximum number of pages and a specific multiple of pages.
- Your printer should provide you with a template that works for your binding method.
- Always ask for a proof, especially with this type of printing project.
Planning for Custom Effects
Embossing and Debossing
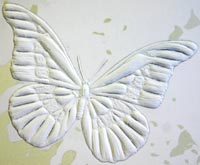
- The thinnest detail should be twice the thickness of the paper.
Die Cutting
Foil Stamping
Planning for Trimming, Cutting and Shaping Your Printed Piece
Your printed piece is going to be cut and trimmed. Your printing company should help you plan your printing properly, so there isn't much you need to do to prepare, but here are the industry terms so you can speak fluent printerese.How to Plan Your Bleed
A bleed is needed when printing extends to the edge of the paper, so when the piece is trimmed or cut to the final size, the artwork goes all they way to the edge. A full bleed describes a print project that has artwork that touches every edge. When in doubt, include bleed in your document.- Create a bleed that is 0.125" on all sides.
- If you're making multi-page InDesign documents add the bleed in document settings.
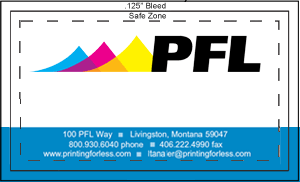
How to Plan Margins or Safe Zones
A margin is the space between the print and the edge of the page, sometimes called the Safe Zone. The margin should be a minimum of 1/16 or .0625", preferably 0.125". You just want to make sure your critical artwork or text has a bit of room so it isn't in danger of being chopped off in the cutting process.Margins become complicated when you print a bound piece like a catalog or booklet. The size of the margin changes on each page because of the wrap of the sheets of paper around the spine. Check with our printer to make sure you get the correct specs for this before laying it out.Choosing Paper & Ink
You'll need to work with your printer to choose the best substrate (paper) for your project. Paper comes in a variety of weights, finishes and coatings.The paper type and weight can sometimes affect how you prepare your press ready files, especially related to folding and binding, so confirm your paper choice with your printer to make sure any considerations are accommodated.Paper options can be daunting: here's what you need to know to get started.Choose Paper with the Right Weight
A paper's weight is, more or less, a measure of its thickness. A higher weight will be sturdier, thicker and firmer. Higher weight papers are great for business cards, bottle-neckers, cards, tags and catalog covers. Lighter weight papers are ideal for brochures, envelopes, stationery and interior pages of catalogs. Higher weight paper is usually more expensive.There are also premium papers that are made with a high quality texture. They feel great to the touch and are used for some stationery, formal invitations, artwork and important legal documents. Choosing a paper weight means thinking about how your piece will be used. Will it be held? Will it be abused in a wallet or purse? Will it be bound into a thick, hundred page catalog? Is it going to be folded?Choose the Paper Type
Papers also come coated or uncoated. Coated papers have a gloss or matte finish that resists smudges and stains and displays the ink brighter and crisper. This also makes writing on the paper difficult. It's best used for brochures, some business cards and marketing pieces that need to look higher end and aren't being used for writing.Uncoated papers lack this solid surface and are more porous. They are easy to write on, but can get smudged and stained more easily and the ink looks duller. There are also synthetic papers that are totally water and chemical resistant and spill proof. They are perfect for menus, industrial stickers or anything that needs to withstand the elements or outdoor use.You can learn more about choosing the right paper here.Additional Paper Coatings
There are also specialty coatings that can be added after a piece is printed. These help protect the entire piece or are used to create eye-catching effects.UV coating, Spot UV, Aqueous coating and varnish provide a high-gloss or matte look and offer protection and improved visual appeal.Exporting Your Work for the Printer
Packaging InDesign Files for a Professional Printer
If you'd prefer to supply the actual InDesign document to your printer - make sure you package the InDesign file. Zip the entire file and provide that to your printer. Your printer will need all of your images and fonts, so you'll need to include the entire package not just the Indd file. When packaging, check the boxes shown below.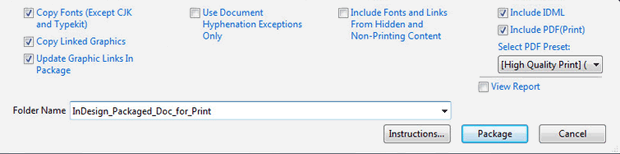
Exporting a PDF from InDesign
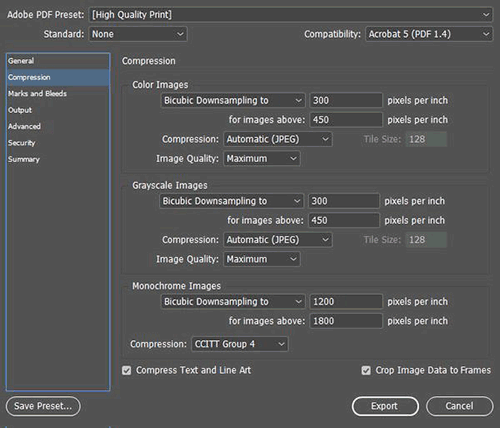
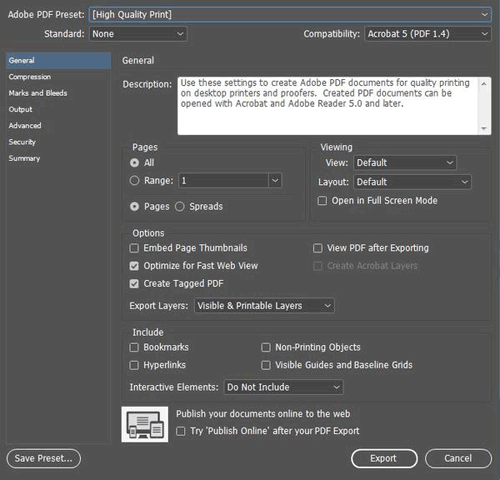
When exporting a PDF from InDesign:- Include all pages
- Export the document in pages not spreads
- Either choose "no compression" or choose Bicubic Downsampling on Color and Greyscale images to 300 pixels per inch for images above 450. For Monochrome images set bicubic downsampling to 1200 pixels per inch for images above 1800.
- For marks and bleeds - don't include any marks, but make sure you check "use document bleed settings" if you included the bleed in your settings. If not, you can specify the .125" bleed here.
Exporting a PDF for a Professional Printer
Exporting your press ready file for the printing company is very easy in all modern page layout and design programs. Usually you'd export everything into a PDF but sometimes you may export the entire project including images, fonts and other elements. Here are some tips to keep in mind, many that have already been mentioned:- Make sure your images are the right DPI (300 or higher) for printing.
- Use vector for text, drawings and logos when possible.
- Don't export a PDF with security settings and password protection unless your printer is prepared for and can work with that security.
- When in doubt, always choose the highest quality file possible.
- If your project file is too big for email, consider using Dropbox or Google Drive to host the file or see if your printer has a solution for handling large files.
Which Paper to Use for Brochures, Postcards, and Catalogs, Business Cards and Greeting Cards
Choosing the right paper for your printing project can make a huge impact on the final product. From final presentation to cost, paper stock is the core of your printed piece. Here are some tips for picking the right paper for different types of printed materials.Business Cards
Business cards should catch the eye, be memorable, and then get out of the way. When your possible customer goes to find your card later, it should look good. There is a large range of paper stocks for business cards, and you can even get cards printed on plastic or other non-paper substrates.Here are some tips for choosing the best paper for a business card:
- Pick an uncoated stock or a dull/matte stock if you want people to be able to write on your card. Uncoated stock is the best option when you want people to be able to write directly on the piece without smudges, but if you have important photos or graphics on your card they will look much more vibrant on the dull/matte stock than on the uncoated stock.
- Using metallic foils or metallic ink? Metallic inks should only be printed on gloss stocks, as the ink will not look metallic at all on uncoated or only slightly on dull/matte stocks.
- Want something that feels interesting to the touch? Use a Soft Touch® coating that makes the card feel like velvet. Request a sample; you have to touch it to get the effect.
- Don't waste time and effectiveness by trying to save a little money. Your business card is an important marketing tool - consider using custom features and get a great design that stands out.
- Learn even more about How to Choose the Best Paper for Your Printing Project.
Paper Recommendations:
- 120# (14 pt) Dull/Matte Cover when you want a final piece that has crisp text and images, while maintaining the ability to write on.
- 100# (14 pt) Uncoated Cover is great for business cards that you'll be writing on and for certain demographics (attorneys, financial, other professional).
- 120# (14 pt) Gloss Cover works best if you're using metallic inks or if you want the professional look and feel of a glossy paper.
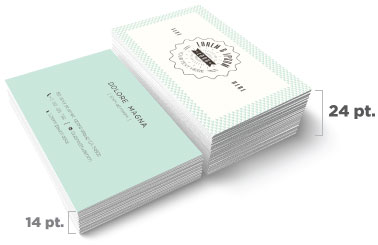
- 160# (18 pt) Gloss Cover is super stiff and thicker than most business cards. Get's noticed, but you can't keep as many in your wallet.
- Magnet Stock keeps your message in front of your clients all year long. Our magnetic stock enables high quality printing with excellent color reproduction and will stick to most metal surfaces. Great for business cards from service industries that could be saved and referenced on the fridge.
- Worried about your cards getting scratched up in pockets and purses? Get free aqueous coating or an optional UV coating to add greater protection for your card and make the colors pop dramatically.
Brochures
Brochures, sell sheets, maps, menus and flyers can all benefit from using the right paper for the job.Here are some tips for choosing the best paper for a brochure:
- Plastic paper like SmartFlex® can create water and tear-proof products like maps or menus.
- Heavier paper is more rigid, helping items stand up when folded. If you are folding your brochure, the maximum recommended thickness for 2 or more folds is 100# cover.
- If the printed piece is going in the mail, it must be the correct thickness to meet postage regulations. The number of folds affects the final thickness. Call us for advice as the 2,000 page postal regulations manual changes often!
- Thicker paper can make metallic foils and embossing look better, but as you go above 80# cover the amount of detail that is able to be shown in your embossed element will decrease.
- If you're printing a lot of materials, thinner paper is usually cheaper and could potentially have a lower mailing cost.
- Learn even more about How to Choose the Best Paper for Your Printing Project.
Paper Recommendations:
- 70# Uncoated Text is great if you want to be able to write on the brochure, and want to add more than two folds. Text stock is lightweight, this paper is similar to the paper you'd find in a book.
- 80# Gloss Text is your choice for brochures that need the professional look of a glossy finish, need more than 2 folds, and that should be lightweight but still strong enough to hold their shape. This is an economical and very common choice for brochures.
- 100# Gloss Text is a great choice for brochures that you want to feel more substantial and that will hold up better to repeated use. This is a very popular stock for brochures.
- 80# Gloss Cover produces a thicker brochure; it's a light weight card stock that can be folded, but might not lay perfectly flat when closed.
- 80# Dull/Matte Cover. This matte coated stock makes images look good without excessive shine, and can be written on with certain pens.
- Brochures can be protected with additional coatings, such as a free aqueous coating or an optional UV coating that provides additional protection and makes colors really shine.
- Learn even more about How to Choose the Best Paper for Your Printing Project.
Postcards
Postcards - especially those sent in the mail - have only a moment to get and keep someone's attention, but they do get handled, held, and read.Here are some tips for choosing the best paper for a postcard:
- Postcards that will be mailed have to meet US Postal Service regulations for size and thickness. In general, your postcards need to be printed on 100# cover or higher to mail. Check out our postcard mailing templates for sizes and layout tips.
- Thicker and larger postcards stand out, but anything larger than 6" x 11" will be require a much higher "Flats Rate" postage.
- Use a UV coating on the non-address side to make your card pop with high-gloss elements while protecting the card from handling and the weather.
- People touch a postcard so use Soft Touch® coating on the non-address side to give it a soft, velvety feel (you have to request a sample - words don't do Soft Touch® justice).
- Learn even more about How to Choose the Best Paper for Your Printing Project.
Paper Recommendations:
- 100# Uncoated Cover. This bright white smooth #1 grade cover stock is a substantial paper, and the minimum thickness for a postcard going in the mail. You can easily write on this stock and is a great option for appointment or reminder cards.
- 120# Dull/Matte Cover. Our dull/matte cover is a substantial paper with a smooth, non-shiny coating. It is a heavy 14 pt stock well suited for detailed, crisp printing without sacrificing the ability to write on the paper. You can also get UV coating on the front of a dull/matte card to add pop to the side that isn't needed for writing. This is a popular choice for postcards.
- 120# Gloss Cover. This is one of our most popular papers, its glossy coating makes photographs and other images look beautiful. UV coating, often called liquid lamination, is a great addition to the 120# Gloss Cover for added pop and shine. Not recommended if you want to be able to write on the postcard.
- 200# Gloss Cover. At 24 pt, this is our thickest and sturdiest card stock. It has a glossy, smooth finish that prints well. It works really well for die cuts and foil stamping. If you're adding foil stamping or die-cuts to your postcard, you can't beat 200# cover stock.
- Use a free aqueous coating or an optional UV coating to protect your postcard from scratches and scuffs while making the colors pop.
- Soft Touch® coating adds a velvety feel to the card that makes it stand out and grab attention, but save some money by only adding it on the non-address side.
Catalogs / Calendars
In print terminology, a catalog is anything that is saddle-stitched like a magazine, but unlike a magazine a catalog can have a range of paper types for the cover and interior pages.Here are some tips for choosing the best paper for a catalog:
- Catalogs are printed in 4 page increments, as each sheet is folded in half into 4 pages (front and back).
- Catalogs are frequently printed with a thick cover stock and thinner text stock for the interior to minimize cost. It is important to match the cover stock and interior text stock so there's consistent color and image quality. For example, if you use 80# gloss cover stock for the cover and 70# uncoated text stock for the interior pages, and you have a consistent brand color on every page, it will look noticeably different on the cover than on the interior pages.
- Catalogs can be saddle-stitched like a magazine, coil bound, Wire-O bound, or glued (perfect bound) like a soft cover book.
- Consider a high-gloss, coated paper for catalogs where art and images are important, and use an uncoated paper you can write on for product lists where readers may want to circle something or take notes.
- If your catalog will be mailed, be conscious of the total weight. You may need to use lighter papers to minimize the overall mailing cost.
- Learn even more about How to Choose the Best Paper for Your Printing Project.
Paper Recommendations:
- 80# Gloss Text. Standard glossy paper stock, about as thick as a quality magazine page. The shiny finish provides an excellent opaque base for four color process printing. This can be either perfect bound or saddle-stitched. Text stock, like this, is usually used for interior pages only unless weight is a factor in mailing cost.
- 80# Dull/Matte Text. This stock is finely coated with a non-gloss finish. It provides an excellent opaque base for easy to read, crisp typography.
- 100# Gloss Text. Similar to the 80# gloss text, but 25% thicker and heavier for a more substantial feel and extra durability. This paper is thick enough to be bound any way you'd like. It's sometimes used for a self-cover when cost or mailing weight are factors.
- 80# Gloss Cover. As a "cover" stock, this paper is stiff, about like a postcard or baseball card. This stock has a glossy finish, making photographs and other images look beautiful. Glossy cover stock is hard to write on, however. Cover stock, like this, is usually used for the cover of a catalog, or for catalogs with only a few pages.
- 80# Dull/Matte Cover. This cover stock is well suited for detailed, crisp printing without a shiny finish. Colors pop with dull/matte stock and it is thick enough to be bound however you'd like.
- Cover and interior papers can be coated with a free gloss aqueous coating or an optional UV coating to provide protection and a high-gloss look that makes colors even more vibrant.
Greeting Cards / Note Cards / Event Notices
A great way to make a personal connection with your customers and prospects. We have a great selection of papers for greeting cards, note cards, announcements and custom stationery.Here are some tips for choosing the best paper for a greeting card:

- Use uncoated stock where people will be writing on the card, such as an RSVP response card, or for certain artistic effects.
- Gloss coated paper will resist writing and leave smudges, but this issue can be minimized by choosing a dull/matte coated stock if your images require the superior print quality of a coated paper stock.
- Our standard card stocks, 120# (14 pt) are optimal for embossing, foil stamping, and die-cutting, all popular options for event cards such as wedding invitations.
- Use textured papers such as linen, ribbed, or parchment to give a sense of luxury or class. They can be custom ordered.
- Learn even more about How to Choose the Best Paper for Your Printing Project.
Paper Recommendations:
- 120# Gloss Cover. This is one of our most popular papers. It is a heavy 14 pt stock with a glossy, coated finish. It makes photographs and other images look beautiful. UV coating, often called liquid lamination, is a great addition to the 120# Gloss Cover for added pop and shine on the outside of the card. Not recommended for cards that need to be written on.
- 120# Dull/Matte Cover. Our dull/matte cover is a substantial paper with a smooth, non-shiny coating. It is a heavy 14 pt stock well suited for detailed, crisp printing without sacrificing the ability to easily write on the paper. You can also get UV coating on the front of a dull/matte card to add pop to the side that isn't needed for writing. This is an excellent choice for greeting cards and note cards.
- 100# Uncoated Cover. This bright white smooth #1 grade cover stock is 14 pt in thickness and matches the 70# text-weight stock we use for letterhead and envelopes. You can easily write on this stock and is a great option for appointment or reminder cards or when a "natural" feel is desired.
- Protect your cards with a free aqueous coating or optional UV coating that provides protection from the elements and makes colors more vibrant.
Coating Options
 Aqueous Coating is a clear water-based coating used to protect your printed pieces. It provides a high-gloss surface that deters dirt and fingerprints. Aqueous coating improves the durability of any printed piece and enhances the look of images. Learn more.UV Coating, often called liquid lamination, is a highly protective, ultra-shiny gloss coating that we apply over aqueous coating and then cure on a special machine using ultraviolet light. The solvent-free UV coating provides an extremely hard finish that's chemical and abrasion resistant. It makes color and details really pop! On deep colors, it results in a stunning, almost wet appearance. Perfect when you want a durable, environmentally-friendly piece with a richer, high-end look and feel. Learn more.
NOTE: UV Coating cannot be used on the addressed side of mailed pieces.
Color Printing Design Tips
Getting Started with your Graphic Design
Designing your own printed piece can seem like a challenge. These handy hints will help you with the process. Here are the first steps.
- Decide the purpose of your piece. Ask yourself the following questions:
- Who will be reading it?
- What is the main point you want them to remember?
- What do you want them to do when they read the material (What is the "call-to-action")?
- How will you be distributing the piece (does it need to have a mailing panel)?
- What is your budget?
- Decide on a format and size for your design.
- Sketch a mock-up of the piece before you start your digital design and layout.
- Understand your choices about color, type, resolution and layout.
- Get on the computer and have fun!
Design with Color
The best designs are simple. Clean lines, organized structure and minimal clutter will ensure that people read and remember your piece. Use a limited set of colors throughout your layout to keep the design consistent. Choose a color for each area of interest including:- Titles — Headlines, Subtitles
- Body Copy — Captions
- Graphics — Borders, Lines, Clip Art
Monitor-to-Print Comparison
Image Resolution
Resolution is the measurement of the number of pixels of color information in an inch.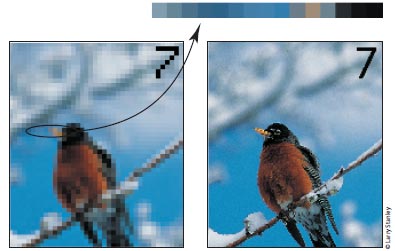
Low Resolution (72 dpi)Good Resolution (300 dpi)
Low resolution images look choppy and lack detail. Super-high resolution (over 400 dpi) will produce large file sizes and longer upload times, with no improvement in visual quality.The Rules of Resolution
- Images should be 300 dpi (dots per inch) at the final size in the layout.
- The settings used during the original "capture" of an image (ie: scanning, digital camera, etc) determine its base resolution. Resolution can only be improved by decreasing the image size, or by recapturing the image at a higher quality setting.
- Images which include text should be 400 dpi at the final size in the layout.
- Resolution and image size are inversely proportional to each other. Enlarge an image, the resolution decreases; reduce an image, the resolution increases. Example: a 2" x 2" image at 300 dpi (acceptable) enlarged to 4" x 4" has a new resolution of 150 dpi (unacceptable).
- Low resolution images print fuzzy, jagged and blurry.
- Recommended minimum resolution for printing is 300 dpi; computer monitors generally have a display setting of 72 or 96 dpi. If we indicate that some of your images have low resolution, they may look fine on your computer monitor but will likely appear blurry or pixelated in print.
Things to Avoid
- Web images are predominately low resolution (72-96 dpi) GIF or JPEG files. This resolution is good for quick transmission over the internet, but is not acceptable for use in printing. Do not save images or graphics from a website to use in your print project!
- Upsampling is when a low resolution image is saved to a higher resolution with no changes in dimensions. Upsampling adds more pixels/dots per inch (dpi), but creates blurry images, ugly blocks of color, and high contrast in images. The only way resolution can be improved is by decreasing the image size, or by recapturing the image at a higher quality setting.
Spot Color or 4-Color?
Spot colors (also called PMS colors) use ink that is custom mixed. Generally, spot color is used with 1- or 2-color printing. Inks like fluorescent orange, metallic gold or Pantone colors are examples of spot color. For more color choices at a lower cost, use CMYK color in your design. Full-color photos are always printed in CMYK.Black and Rich Black
 Black colors in print are not all the same. On computer monitors, all blacks will generally appear consistent. But on press, different ink combinations can create a wide range of blacks. When black is the text color, use flat black (CMYK 0-0-0-100) for the best results. If you have a solid black area larger than two square inches, we recommend using a "rich black" for a darker, more uniform color. The rich black color build we recommend is 50-35-15-100.
Background Color
Make sure your design has enough contrast between the type color and the background color. The examples below show how font and background colors can cause readability issues.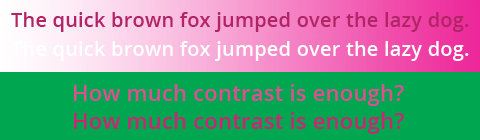
Number of Fonts
Minimize the number of font styles for your entire design (preferably 3 or less). Keep it simple! Read more about designing with text.Type Size and Color
Type smaller than 10 point can be difficult to read. Type smaller than 14 point should be made with 3 or fewer of the CMYK colors to avoid mis-registration.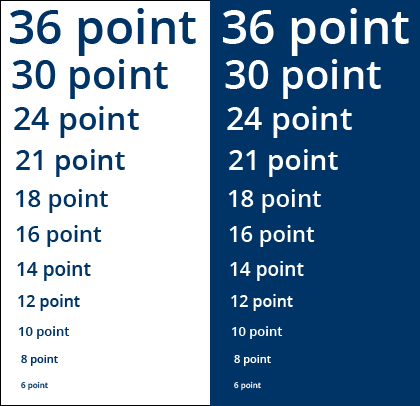
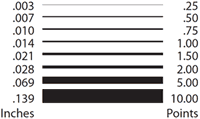
Line Width
"Hairlines" or very thin lines will not print well. Set line thickness to at least .25 points or .003 inches in width. A one or two-point line looks great around photographs.Bleeds
"Bleed" refers to images or graphics that go to the edges of the paper on the final printed piece (also called "full bleed").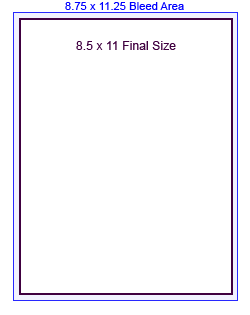 When designing for bleed, you should make your document .25" larger on both your horizontal and vertical dimensions. For instance, if the final size of your piece is 8.5" x 11" then make your document 8.75" x 11.25". Add guides to your layout that are .125" from the edge all the way around. Now create your design with the idea that the layout will be cut off where those guides are - because that is exactly what will happen. Make sure that any photographs or backgrounds that you want to bleed go clear out to the perimeter of the document, past the guidelines. After your piece is printed, we will trim off that extra .125" all the way around, leaving you with color all the way to the edges!
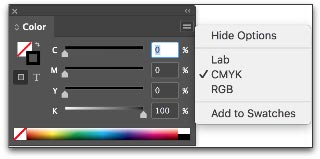
CMYK: The Formula for Success
Full-color printing, also called "4-color process," uses Cyan (C), Magenta (M), Yellow (Y), and Black (K) inks in different percentage combinations to create the colors we see in print. By specifying your design elements using a CMYK formula, you can be confident that you will get the colors you want. Create your design in CMYK color instead of RGB whenever possible.The swatches below are CMYK color builds, shown with their "recipes," or C-M-Y-K percentages. If your graphic arts printing file specifies any of these color combinations, the colors in your final piece will turn out very close to what you see here. Your printer and monitor may preview different results, but this is what you can expect.Embossed Business Cards
Your Business Card Should RISE to the Occasion
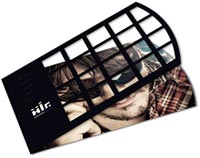
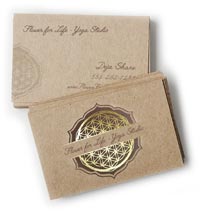
Embossed business cards are an ideal way for you to bring attention to the message you want to convey. Being forgettable is not an option in today's competitive business environment. Custom business cards that utilize embossing stand out, and add a dimension of sophistication to your image.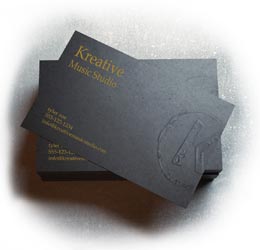
What exactly is embossing?
The process known as embossing utilizes two opposite etched metal dies (usually composed of copper, magnesium or brass) and heat. These elements push/raise the graphic or text above the surface of a sheet of paper to create a three-dimensional, eye-popping effect. A reversed image of the design is used to make the embossing die. If the design is indented rather than raised, it is called debossing.You have probably seen or felt the raised surface of a notary seal; this is embossing. Business cards can be blind embossed, which is simply an imprint without ink or foil applied. Embossing with foil or color on the imprint adds another visually appealing and distinctive element to your business card.Why Embossed Cards?
Custom printing is our specialty for a reason. Quality business cards that leave an impression give you more impact for your dollar. Grabbing the attention of potential clients and driving attention to your brand are essential to success, and embossing is an elegant way to market your business message, making it memorable.Considering how many business cards your potential customers get each day and at trade shows and conventions, this custom effect can make all the difference in getting noticed. Embossed business cards make that lasting impression and are a great choice when considering business card ideas that yield results!Can I see some Examples?
We thought you'd never ask. We are happy to provide examples of the quality and creativity PrintingForLess.com is known for. Take a look at these great ideas for embossed business cards.


Can I get an idea of cost?
Sure! We have a large selection of paper, finishes, and custom options so we will provide some basic pricing information for your consideration. To get a custom business card quote that includes embossing, simply call 800-930-6040 to talk to one of our friendly printing experts, or Request a Quote.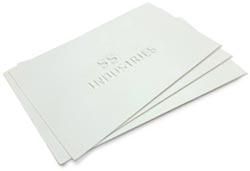
3.5 x 2 Embossed Business Card
4 Color Process, Gloss Aqueous Coating
120# Gloss Cover 14pt
Quantity: 500 cards Total: $316.43
Price subject to change. Call to verify.
4 Color Process, Gloss Aqueous Coating
120# Gloss Cover 14pt
Quantity: 500 cards Total: $316.43
Price subject to change. Call to verify.


Comments
Post a Comment